 02 How to Program your Hearing Aids
Disclaimer: Hearing aids come in different models for different hearing losses (mild, moderate, severe, profound). Heed the warnings that come with power hearing aids like this example>> CAUTION: BTE Power hearing aid is a powerful hearing instrument. If you have been fitted with BTE Power, never allow others to wear your hearing instruments as incorrect usage could cause permanent damage to their hearing.
These DIY School documents are not meant to encourage self-fitting of your hearing aids. It can be technically challanging and is not for everyone. Though, if you have already decided to self-fit your hearing aids then you may benefit from this extra information on the subject. Also this extra information may come in handy simply for gaining more knowledge about what your audiologist is doing (or not doing) for you.
Prerequisite ReBranded hearing aids are usually locked!
Most hearing aid manufacturers produce ReBranded hearing aid models for the “after market” such as healthcare, and anyname franchises. These are generally (de-featured/without features of the premium model). It won’t do much good to spend money and effort, trying to self-program locked hearing aids unless you know how to unlock them. For more information about ReBranded hearing aids please read two DIY School PDF files;
• 01 Free Hearing Aid Fitting Software
• Unlocking ReBranded Hearing Aids
Education via Utube Video:
Thanks to HoH-Community member @raylock1 for this video link about → How to DIY Program Hearing Aids Yourself from BRIAN (@hearing club) or (BRIAN @the hearing club). I am unsure about the various hearing-club handles since we have been buying flex connects and battery pill adapters from a similar-named website for many years?
The video is about Philips HearSuite fitting software for Philips 9030/9040/9050 hearing aids. But the video easily translates to Oticon/Bernafon, and the concept itself can be applied to most other hearing aid brands. I am not saying this is what you should do. I'm just saying this gives you insight on the vast number of settings that can be adjusted.
For DIYers, I recommend setting Target Gain acclimatization time period to 100% and forego the initial partial volume phase that allows you to become accustomed to the amplified sounds of hearing aids. You may need the acclimatization time period when you are new to hearing aids, But how the heck are you going to determine what settings are best for you when the volume is artificially turned down?
Caveat/Warning about this above-linked (and very excellent video); Note that whenever you use the “Set to target” feature (designated with the little rifle-scope bulls-eye icon), then you are destroying your previous settings. Your previous settings will be replaced whenever a new (Rx/Prescription) is calculated to produce new gain settings. Thus, it is important for you to read and understand a below (Step 4 – Save your Original Professional Settings (if any) before you destroy your original settings without saving them first. Also note there is no “Pairing” between hearing aids and the fitting software, only “Connect”. Though you may need to off/on cycle the hearing aids in preparation for “Connect”.
Practice using the fitting software:
It is difficult or impossible to get any practice using the fitting software without selecting a real client and connecting to your hearing aids to use the real hearing aid settings. Look for a Simulate or Training feature that may be provided in some manufacturer’s fitting software. Oticon Genie2, ReSound’s SmartFit, others?, have a Simulate feature that allows you to try various settings in a simulation mode. Phonak Target has a Pulldown Selector to the right of “New Session”. You can pull it down and select “New Training Session”. These simulations will help you to get a feel for how the software works.
Alternatively, you could create a make-believe client, Joe Blow, and quickly click some points/any points on a make-believe Audiogram. Then you can practice using that make-believe client. Caution: Be very careful not to accidentally save your make-believe practice settings to your hearing aids, overwriting your valuable current hearing aid settings. Don’t take this lightly because your default upon exiting the software is to SAVE. When I use this Joe Blow practice technique, I practice without ever connecting my hearing aids, so the worse I could do is mess up the last database client session.
Programming hearing aids for music:
Some hearing aids have factory “programs” that can be selected when listening to music. If you are interested in learning more about the details of a typical music program, then here’s a link to a PDF file named Starting out with a music program. It recommends changes such as disabling noise management, wind-noise management, and many more changes to prevent your hearing aids from altering the soundscape for the primary purpose of prioritizing speech.
Step 1 – Install Fitting Software on a Windows computer FIRST
Complete this Step-1 first. Get the fitting software setup and ready to recognize your specific model hearing aid. For assistance in finding software, read the DIY School file named (01 Free Hearing Aid Fitting Software). Setup the software on a Windows computer before you start spending money on equipment. You will need the latest version of fitting software for recent model hearing aids, or maybe the legacy version for older models. The software is free and “generally available”. Though, some manufacturers like to hide it, or make it very difficult to obtain. You may ask what’s the reason for doing this step first? This step is a free step. But some find this first step technically challenging, or impossible to complete, so why start spending money for gear when you may face failure on this first/free step? Another reason for doing this first is, the software may pre-load a driver for later use by your hearing aid programming device.
Step 2 - Purchase a hearing aid programming device
For DIY self programming you will need a hearing aid programming device/hardware. Bluetooth Pairing technology is for streaming Audio and such. You are not streaming Audio. Also, you cannot use Remote fitting. Please read a DIY School file named (01 Free Hearing Aid Fitting Software) as to why.
Selecting the correct programming device is not a trivial step because older/legacy hearing aids use cables and such to connect the hearing aid programming device to the hearing aids. In order to avoid Noahlink Wireless driver problems, try installing the fitting software first (before plugging in your programming device) If you do encounter Noahlink Wireless driver problems, read a DIY School PDF file named (Noahlink Wireless - Instructions For Use) and scroll down to a section named (Noahlink Wireless Driver Errors).
Step 3 – Choose (1 of 3) origins for measuring your hearing loss
1. Perhaps settings for your specific hearing loss already exist in your hearing aids. Professionally fit hearing aids use your paper audiogram (or a digital version) to enter your hearing loss into the fitting software, and may also use an additional measuring system to achieve REM/Real Ear Measurement. Then your settings (which are prescribed for your hearing loss) are stored in the hearing aids that you purchased, or if you didn’t purchase the HAs maybe you at least got a copy of your paper audiogram which is a by-product of the professional fitting.
2. Self-Programmers sometimes enter their hearing loss from the paper audiogram. For example; When you get only a hearing test without purchasing any hearing aids, and you also score a copy of your paper audiogram, and then buy used hearing aids from Ebay.
3. Self-programmers can also use the In situ software feature to measure their hearing loss. This is accomplished by adjusting the loudness of a tone (played from your hearing aid into your ear) until that tone becomes audible. After measuring the audible tone for each frequency (and for each/both ears), then the new settings (based on audible tones) can be prescribed and saved into your hearing aids (and database).
REM should be the most precise. But not all audiologists perform REM (so there's that). If your hearing aids have already been professionally programmed using REM then you will want to save the important original professional settings to your database before you make any changes. See next section in this document for saving the original settings.
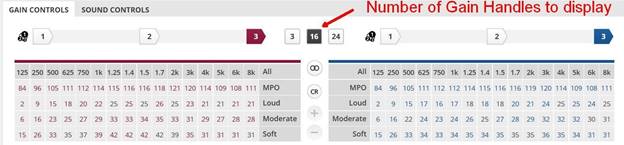
Noteworthy is that once your hearing loss has been measured, and settings prescribed for that measured loss (sometimes call First Fit) then your hearing loss measurements (namely; your Audiogram, or REM-adjustments/in-sutu) are no longer needed and no longer used. Your settings (namely; amount of gain for each frequency) are now prescribed/Rx’d and there is no need to provide any further measuring of your hearing loss unless you want to start over. Here is a numerically depicted version of your settings which can be displayed using few or many gain handles/a.k.a frequencies;
Step 4 – Save your Original Professional Settings (if any)
An important feature for keeping track of changes to your hearing aid settings/HA settings is the concept of keeping your database settings an exact match to your HA settings! Normally, you can proceed without getting a (Settings Mismatch Warning) because your HA settings have a
DateTimestamp that matches the DateTimestamp of the last database session. Caveat; You are allowed to bypass this matching DateTimestamp requirement when this is the first time connecting your HAs (with a new database client) because your new database client is empty. Caveat2; This is how it works for Oticon and I suspect that it works this same was for other manufacturers. But I cannot say for certain without testing all other brands?
At the END FITTING step, the fitting software typically asks where to save the settings? Note that your fitting changes are already temporarily applied to the HAs (at the time-you-make-a-change). However, you still get to choose where and whether to save the settings permanently.
• In the HAs?
• In the database?
• Neither HAs or Database – in other words – Don’t save any changes.
• Both the HAs and the database? Both is the typical choice for saving your changes, giving a standard result of your hearing aid settings always matching your last database session.
After saving setting to both places, you are now in sync with hearing aid settings saved in two places, your hearing aids, and your database.
We as self-programmers, want to do something special for our very first session with HAs that were professionally fit and maybe also measured with REM. We want to save the original settings to our database (without making any changes). This gives us the ability to revert back to the Original Professional Settings. During your very first fitting session, use the settings from the HAs and then (immediately) save the settings to Both the hearing aids and the database without changing any of the settings. That’s it! You are done. Easy/Peasy, right? The first database session is now a copy of your Original Professional Settings. Furthermore, future fitting sessions can now proceed without the warning about a settings mismatch, because the settings in the hearing aids now match the settings in your database. Caveat: Not all fitting software retains Acoustics settings in the hearing aids so you may want to verify correct acoustics are specified (Dome open/closed, or Mold with a specific vent size).
However! There is an undesirable side effect of initially saving to Both. The procedure for determining whether the hearing aid settings match the database settings is based on DateTimestamp. Therefore, now that the hearing aids match “your” database, they will no longer match your Audi’s database. More on this eventual conflict with your Audi later...
After the first session, the procedure is the same, except you will typically be making fitting changes. At the end of the fitting session, choose the standard option to save the settings to Both the HAs and the database. This has the effect of over-writing the previous settings in your HAs and creating a new session in your database.
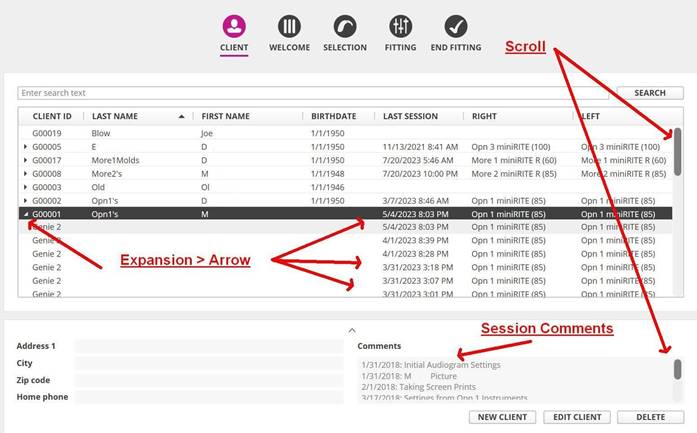
While reading this paragraph, take notice (and comfort) of the fact that database sessions are neverever- overwritten. There is a question of where to save Original Professional Settings? Save the Original Professional Settings as your first database session!! Some may suggest creating a separate client as a simple place to save the original settings. Heavy sigh,,, there is no need for creating a separate client! Your Original Professional Settings will always be available as the very first session. Important Tip: you may have to click an “>” expansion arrow to see multiple fitting sessions which potentially adds confusion for some ppl. Your first session is the logical place for storing the Original Professional Settings!
SETTINGS MISMATCH WARNING: Now let’s talk about a settings mismatch warning. Normally you begin each new fitting session by selecting a database client (automatically defaulting to that clients latest fitting session) and the fitting software connects to the HAs. Typically the hearing aid DateTimestamp matches the database DateTimestamp and you proceed normally without a warning. Though, certain odd circumstances may produce a warning. For example, you bought another pair of hearing aids.
CONFLICT WITH YOUR AUDI: Your Audiologist will always know when someone has saved ANY settings to the hearing aids . Why? The mismatch-comparison is based on DateTimestamps, not the actual settings. When/if you return to your Audiologist, then your Audi will get the same settings mismatch warning. The warning will occur even if you revert back to the Original Professional Settings. There is no way around it except to never save any settings to the HAs, which defeats the entire purpose of self fitting! Here’s a -> Discussion Link. As consolation for your Audi; He/She can easily start from the Audi’s
last database
session and that is exactly what
they usually do. Maybe it’s best
to have prior discussion with your Audi about self-fitting.
Reverting Back to Older Database Sessions
Reverting back to an older database session (as a new starting point) has proven to be confusing for some ppl. Big Tip: You may be required to click an “>” expansion arrow in order to show a list of all fitting sessions. After clicking the “>” expansion arrow you can find all sessions listed in chronological order by date and time. But even while viewing the sessions, your “Session Comments” may be in a separate display window and not included in the list of sessions. Keep scrolling and comparing SessionDate with the Session Comments and also comparing the Comments-Date until you have a clear understanding of which database session you wish to revert back to.
Reverting to a previous session is not that difficult. Here’s a Tip that can help. Choose your wording for Session Comments carefully, with a bias towards clearly marking a few important sessions that you may want to revert back to at some future time. For example, if you have fifteen sessions in a row where you are trying to get you TV Streaming sounds to suit your preferences, those sessions comments are not very important because the sessions are not likely to be reverted back to. But you should clearly mark something like; “Original Audi Settings” so you can easily find and revert back to these settings. Here’s an example below (though the example represents only one brand of fitting software so YMMV). Perhaps you can look for similarities within your own brand of fitting software.
Limiting client database session proliferation
First let's review some rules about client sessions;
• Each client has multiple sessions
• You can have as many sessions as you want
• Sessions are permanent and never-ever overwritten
Tip 1: Assuming your hearing aids were professionally fit and maybe even had (best practice)-REM/Real Ear Measurement changes applied. During your very first fitting session, use the settings from the HAs and then (immediately) save the settings to Both the hearing aids and the database without changing any of the settings. That’s it! You are done. Easy/Peasy, right? The first database session is now (and always will be) a copy of your Original Professional Settings.
But now let's talk about whether you wish to organize/limit the number of future fitting sessions (or not)? Client database session proliferation is likely to occur in a DIYer's database and not in a professional audiologist database. Why? Because DIYers like to experiment and may go off on a testingtangent that results in adding a large number of fitting sessions.
The additional sessions are likely mostly the same, or worse (of no historical value because you decided to scrap the experimental fitting sessions, and revert back to your previous settings. When going off on a
tangent I like to create a new temporary client for testing. After testing (and if I like the tested changes), then I can apply the tested changes to my real client, and optionally delete the test client. On the other hand (if I don't like the changes), then I can revert my hearing aid settings back to the settings from the real database (last session), and optionally delete the test client.
Let's look at the difference in client database sessions proliferation:
Scenario #1 I like the changes - Real Client (Larry Katari)
Session 1; Original Professional Settings
Session 2; Adjustments for SIN/Speech In Noise
Scenario #2 I don't like the changes - Real Client (Larry Katari)
Session 1; Original Professional Settings
Session 2; Revert back to Previous Settings
Scenario#3 (no effort to minimize client database sessions proliferation) Real Client (Larry Katari)
Session 1; Original Professional Settings
Session 2; Adjustments for SIN (Speech-In-Noise) Tweak
Session 3; Adjustments for SIN/Undo Tweak
Session 4; Adjustments for SIN/Second Tweak
Session 5; Adjustments for SIN/another Tweak
Session 6; Adjustments for SIN/another Tweak Session 7; Adjustments for SIN/another Tweak etc, etc, etc - depending on how much experimentation
Self Programming Don’ts:
When installing hearing aid fitting software don’t choose the option to participate in the improve software feature. No need to have extra automatic communication with manufacturer!!
Don’t use the Noah system software (currently Noah4 or Noah-ES). Noah system software is never required for any manufacturer’s fitting software. Professional Audiologists need the Noah system software to group many clients into a one Noah database and provide automatic startup interfaces for the different manufacturer’s fitting software. If you are a self-programmer, it is simpler and cheaper to run the manufacturer’s fitting software standalone. When fitting software is run standalone it will use its own database. Repeat,,, Do not use the Noah System software!
Don’t confuse the above Noah system software (currently Noah4 or Noah-ES) with the Noahlink Wireless programming device. Don’t confuse an old obsolete programming device named NOAHlink with the Noahlink Wireless programming device. Noah, NOAHlink, and Noahlink Wireless are three different things.
Don’t walk away (with your HAs in your ears) in the middle of a wireless HA firmware update. Take the following precautionary step during HA firmware updates; Remove the HAs from your ears and place them next to the wireless programming device. Also, don’t use old batteries during firmware updates.
Don't program only one hearing aid of a pair. Wireless Hearing Aids/HAs (which is almost all modern HAs) are automatically matched/paired together during a fitting session using the manufacturer's fitting software. This is not the same as standard Bluetooth pairing for streaming audio which can be un-paired and re-paired to various Bluetooth devices. Instead, this pairing is designed to allow your left/right HAs to communicate only with each other and not mistakenly communicate with other nearby HAs. This facilitates binaural features such as pressing a button on one HA to change volume in both HAs plus many other binaural features, such as binaural automatic speech-in-noise adjustments when you walk into a crowded restaurant. If you inadvertently program only one hearing aid of a pair (maybe because of factory repair, or perhaps one HA was lost) then the binaural communication will be disabled. Thereafter, the binaural communication can only be restored by reprogramming both HAs together as a pair using the manufacturer's fitting software. Tip: It may be necessary to start the fitting session using the settings from the database because a repaired/replaced HA may not have your previous settings.
Don’t try to pair everything! You can’t pair your hearing aid programming device to the fitting software. Look inside the fitting software for a Select/Connect button to mouse-click for connecting to your hearing aid programming device. Also, you can’t pair your hearing aid programming device to your HAs. Look for a Detect button in the fitting software that you can mouse-click for connecting to your hearing aids.
Don’t assume that you can use your the remote fitting option along with your cellphone to program your HAs (similar to your audiologist changing your HA settings remotely).
Don’t expect factory support, or support from your local audiologist when you program your own HAs that you bought from EBay. Though, maybe you can still use them for things like custom ear-molds. You will likely have no warranty unless there is remaining warranty and you are able to get it transferred into your name. Think carefully about using factory repair for HAs bought on EBay (especially bargain priced HAs from a new seller). HAs that were reported lost may get confiscated at the factory. Factory repair is way too expensive anyway. Perhaps, consider buying a used replacement HA. Though be careful about buying used rechargeable hearing aids with non-replaceable batteries. That is unwise, to say the least.
Don’t fret about your HA warranty. If you bought your HAs with a legitimate warranty, then that warranty is still good. Your warranty is not void just because you are self fitting your HAs. See this forum thread.
Don’t expect your rechargeable hearing aids (with built-in/non replaceable batteries) to last longer than 3 years or so. Read a DIY School PDF file named (Buying Rechargeable Hearing Aids). This has morphed into many heated discussions about rechargeable vs disposable batteries.